Monday, October 31, 2011

Suede Flower Detail

     This was originally posted on Blooms and Bugs.  Anshu and I did a blog swap, my first!  Here's my post,  I didn't change a thing:


     Hello!  My name is Rikka J. and I am visiting from the blog Ricochet and Away!  I am a small town girl from rural Montana who loves to sew handbags.  I first met Anshu when I came across her cute Military and Lace Dress.  Anshu has a real handle on sewing knits--something I've always shied away from.  But she was very helpful and suggested a using a walking foot on my sewing machine.  I'm going to try it out.  Fingers crossed because my last attempts at sewing jersey were abysmal!  Anshu and I are swapping blogs for a day.  How exciting!  So be sure to head over to Ricochet and Away! and check out what she is posting today.   


     For my post today, I tried to come up with an idea that would compliment and not duplicate any of the terrific projects Anshu has already created.  So I thought I'd share with you all a simple flower embellishment tutorial.  I placed the flower on a purse, but I think it would be great as a broach or added to a headband. I hope you like it!  (Remember you can click on any photo to see it larger.)
     
     My cousin was married last month in a beautiful outdoor ceremony in rural Montana.  I bought this obnoxious fun zebra print dress to wear, but didn't have the right purse to go with it.  Some ladies fret over what shoes to wear, but I'm not one of them.  I'm a bag lady through and through!  To solve my handbag dilemma, I headed over to my local thrift store and found a purple leather purse with a thin shoulder strap.  Perfect!


     Here's a look at the thrifted purse "before". It was in perfect condition.  I loved the structured design, and the size was just right.  I could fit my wallet, keys, cell, lip gloss, AND a pair of those disposable slippers for my aching feet.  (I've never conditioned my body for wearing heels so every time I dress up, I pay for it!)  The price on the purse was $2.99, but I dickered it down to $1.25.  Well, the dickering consisted of me saying I'd take 4 purses for $5.  Another example of how buying in bulk saves you money!

     Problems with the purse?  Well, upon bringing it home, I discovered it's not the correct shade of purple to match my dress.  And of course, there was the ugly interesting button on the flap that needed to be dealt with.  


     Leather is so expensive, but I love to use it in my crafts. To make
it more affordable, I turn to thrift stores and garage sales.  For this
project I used some green suede that came from a garage sale, a 
lavender suede that was from a thrifted skirt, and some darker purple 
suede that came from a pair of thrifted trousers.  Now who would give up a perfectly decent pair of purple suede pants to a charity shop?
LOL, lucky for me they did!  If leather isn't an option for you, 
I suggest felt or vinyl because they have a stiff quality and
 you won't have to worry about fraying.


List of Supplies:
  • Suede, micro-suede,  felt, or vinyl       
  • Fabric glue
  • Clothes pins
  • Scissors
  • Button(s) or beads
  • Thin wire and pliers or needle and thread
           

  • The first step was to cut out 5 pf each color of suede teardrops.  I did this by using my die cutter, but scissors would work just as well.  
  • The next step was to glue a little fold or pleat into the pointed end of each teardrop.  I held the pleat down with a clothes pin while the glue dried.  
  • Then, I used a piece of suede as a base and glued the leaves/petals to it.  I used Tacky Glue. It dries clear and is still holding very well.  

  • I used my die cutter again to cut out a small daisy-like shape to cover all the pleated points of the teardrops.  The die cutter made this pretty easy, but again I think scissors would work just as well.
  • I found this shiny faceted button in my stash to use for the center of my flower.  Suede is hard to push a needle through so I opted to sew the button onto this daisy shape rather than through all the layers of the entire flower.  
  • Actually, I didn't technically "sew" it on.  I used one of my sturdy upholstery needles to poke a couple of holes in the center of the daisy.  Then, I used a length of craft wire to attach the button.

The next step was to glue the daisy onto the rest of the flower.  Here's a good look at the front and back.

The original button popped right off and I glued the suede flower right on the flap.


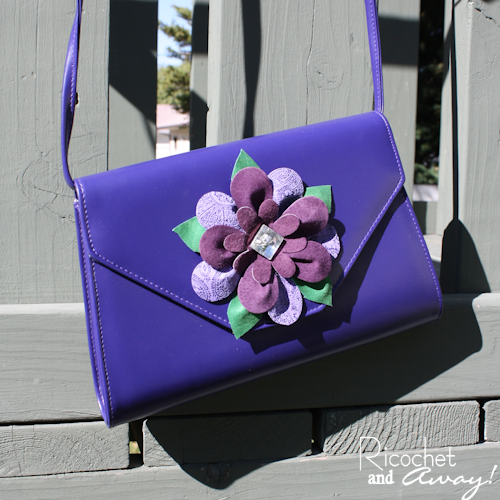
And here it is all finished.  I love it!
     I hope you all were inspired to try out this simple technique.  And while I'm here, I hope you don't mind if I shamelessly plug the Retro Pillow Challenge.  The challenge is in it's voting stage this month (Oct 2011) and I'm sure all 12 of the participants would love for you to check out their creations and vote for your favorite:  

After you vote, come and check out our newest sewing challenge:

Sign-ups for the Tote Challenge have already begun!


Happy Crafting and Big Hugs from Montana,

Friday, October 28, 2011

My Owl Obsession!

Hello.  My name is Rikka, and I'm obsessed with owls.

It all started with one little owl purse:
Add caption

. . .and that led to another purse:
. . . which led to another purse:
. . . which led to a little ID wallet:


. . . which led to my latest owl bag:


And there are more bags in the works!

All this owliness is so much a part of me that I've already blogged about it once before in a post entitled Crazy About Owls!   I have a pinterst board dedicated solely to owls entitled Owl Craziness.  (Pinterest is another of my addictions!)  I wanted to share with you a few of my favorite owl pins, but honestly had some trouble narrowing it down!  It took a while, but I finally came up with this little montage:


Source: etsy.com via Rikka on Pinterest
Source: vivaterra.com via Rikka on Pinterest
Source: None via Rikka on Pinterest
Source: google.com via Rikka on Pinterest
Source: veetje.be via Rikka 
Source: vivaterra.com via Rikka on Pinterest
Source: None via Rikka on Pinterest

Source: None via Rikka on Pinterest


Source: elenaeris.blogspot.com via 


Family_Close
{source}

Source: Uploaded by user via Rikka 
Source: None via Rikka on Pinterest
t


Now, aren't owls fun?
Thanks for checking out my post today!
Obsessions are much more fun when you have someone to share them with!

There is still time to vote for your favorite Retro Pillow here.  Last to vote is Oct. 31st, 2011.

Check out our latest challenge here.  Sign-up has begun!

Happy crafting and big hugs from Montana,

Sunday, October 23, 2011

The Chevron Rag Quilt


My second quilt ever is done, and all my kidlets are as pleased as punch!  If you're here for the first time, you missed seeing the pinkalicious rag quilt I made for my daughter, so I hope you'll take a look-see right here.

My son, who is 7, was not going to be down with anything even remotely resembling a baby quilt.  And I, having just finished little sister's quilt with 100 blocks, was looking for something fast and simple.  With that in mind, I attempted to make his quilt as big-boy-ish as I could and use fewer, larger sized blocks. My design inspiration: chevrons.  Those trendy zig-zags are so popular right now, and paired with some cool "big boy" colors, I knew I had a winner.  So I got out my sketch book and came up with a not-quite-perfect-but-definitely-easy method of making a rag quilt with chevrons.

I made 3 major deviations from little sister's quilt:
  1. Rectangle shaped blocks arranged in a brick-like pattern.
  2. Some frayed seam allowances are shown on BOTH sides of the quilt.
  3. Did not "square-up" the perimeter of the quilt.
The first deviation saved my sanity by allowing me to cut out a mere 72 fabric rectangles--as opposed to the 200 squares I had to cut for the first quilt. (let's not even mention the batting, OK?)  The second deviation helped to break up the striped fabric that dominated the back of the quilt.  The third deviation just saved me a ton of time.  Plus, my son thinks the jagged edges are "just like lizard spikes" and that's pretty cool to a 7 y.o. boy.

Check out some pics of the finished project and keep scrolling for the tutorial:


Here's the front.
The short sides of the rectangles have frayed seams on the front side.
Here's the back.
The back side displays the fraying in the long seams.
My inspiration?  Check out these quilts from my pinterest "quilts" board:  


Source: 3.bp.blogspot.com via 


Source: None via Rikka on Pinterest

There are a lot of great rag quilt tutorials out there.  I listed 4 tutorials in this post.  I made this chevron quilt slightly different from the norm, so I thought I'd offer you a brief explanation of how I put it all together.  

Here's my list of supplies:
  • 34 rectangles of fabric for the back----7" x 13"
  • 34 rectangles of batting----------------6" x 12"
  • 34 rectangles of fabric for the front-----7" x 13"
  • coordinating 100% cotton thread
  • sewing machine
  • scissors
Because this design requires a precise arrangement of fabrics, I laid out everything on the floor.  After each sewing step, I returned everything back to the floor, ensuring nothing got switched around.

Remember, you can enlarge the photos by clicking on them.  

These pics show how to create your fabric-batting-fabric sandwiches.
  • Left pic: Lay out the fabric of the back, wrong side up.
  • Center:  The rectangles of batting are centered on each piece.
  • Right pic:  The rectangles reserved for the front are placed on top of the batting, right side up. 

These pics show the three stages of sewing.
  • Left pic:  Each sandwich is pinned and quilted.  I quilted a simple X in each rectangle.  
  • Center:  Stitch together the adjacent short sides of each rectangle.  I grabbed one row at a time and made it so the raw edges of each seam were visible on the front side of the quilt.  After all this stitching was done, I had 9 long strips of varying lengths.
  • Right pic:  Stitch together the long strips.  I made these seams so the raw edges would be visible on the back side of the quilt.  I thought I was being very careful, but still managed to reverse one of the strips.  At least it wasn't one of the longer strips in the middle!  

These pics show the quilt all sewn together, before the snipping and fraying of the raw edges is done.
  • Left pic:  I fixed the mistake and this is what the front looked like after all the seams were sewn.
  • Center:  This is what the back looked like.
  • Right pic:  This shows the front side.  The short sides of the rectangles have the raw edges of the seam allowances in view.  The raw edges of the long seams are visible only on the back side.
  • Not shown:  I stitched a double row of straight stitches all around the perimeter of the quilt .5" from the edge. Then, I snipped all the raw edges about every .25", being careful not to cut through the stitching.  The last step was to machine wash and dry twice.  The resulting frayed edges were soft and fluffy.  Cool, eh?  
  • The finished dimensions are roughly 52" x 52".

Little sister was my photographer's assistant!

Big brother likes how his new quilt matches his Cub Scout uniform.  
In conclusion, I'd like to mention a few things I've learned so far about rag quilting:

  • The cutting can be a tiny bit wonky:  You can play a little game of give and take with the seam allowances if the blocks don't come together perfectly.  I cut all my blocks using a regular ruler and some scissors, often cutting through multiple layers at once.  That method made for some less than precise cuts, but it all worked out in the end.  Cutting mats and rotary scissors are cool, but I don't own any (yet!) and did just fine.
  • Denim is a superb fray-er:  The denim frayed so well after only one washing that I am slightly concerned it may eventually unravel right out of the seam.  I'll have to keep an eye on it.  Should you decide to use denim in your rag quilt, I'd recommend a double row of stitching OR a narrow zig-zag stitch over the straight stitch to strengthen all the seams with denim.
  • Hindsight for making better chevrons:  If I could do it all over again, I would have ditched the stripes and just stuck with solids.  Also, the chevron design could have been reinforced with some creative quilting.  Meaning, the quilted X's didn't help the chevron concept.  If I could do it again, I would quilt it like this:


I am so pleased you took the time to read through my little crafty journey!  I've got a lot more creativity in store for you all, so stay tuned!  I hope that while you are here at Ricochet and Away!, you will check out The Solids-Only Tote Challenge here.  This is a sewing event hosted by me and Keren from sew la vie.  Our Retro Pillow Challenge was a smashing success and we hope to make this new challenge even bigger!  We are currently accepting participants.


Happy crafting and big hugs from Montana,
this is my craftgawker photo!
Finally!


Related Posts Plugin for WordPress, Blogger...