Monday, December 24, 2012

A Holiday Gift to my Readers:

My kids are 6 and 8 now.  They are very smart and creative and beautiful.  They are goofy and silly and funny.   They constantly remind me to be patient and kind and consistent.  I recorded this video when they were 3 and 5.  Danika had just begun talking like a big girl and I so enjoyed hearing her philosophical perspective on the world.  Riley was (and still is!) all boy.  He was (and still is!) a noisy little imp who loved to entertain a crowd with his goofy antics.  

I wanted to share this video with you because I believe it epitomizes life in our home.  We talk and listen.  We laugh and play.  We foster creativity and encourage fantastic storytelling.  We are often ridiculous and sometimes witty.  I can't give you all a physical Christmas gift this year, so I decided to give you something personal and share a slice of my life.

It's a long video, but I encourage you watch it all the way through because there are lots of funny and sweet moments throughout.  I dare you to watch it and not smile.  


I hope you enjoyed this!
Merry Christmas!
Happy Hanukkah!
Happy New Year!

Big Hugs from Montana,
Pin It

Wednesday, December 19, 2012

Scrappy Chenille Scarf


One of the participants from my scarf-making challenge made a chenille scarf that I really liked.  Her name is Linda and she wrote a great tutorial for her scarf that you can find HERE.  


Linda's scarf is made up of 7 layers of fabric.  The center layer of fabric is never cut and serves as a background color (black, in Linda's case)  for both sides of the scarf.  After I got 6 pieces of fabric cut, I thought my scarf was already looking very thick.  It's hard to tie and twist a really thick scarf, so I figured out a slightly different method to cut the scarf using only 6 layers of fabric.  
This is a diagram of a cross section of my scarf.
The center layers are grey flannel.
The white vertical lines show the stitching which goes through all 6 layers of fabric.
The black vertical lines show where I cut through 2 and sometimes 3 layers of fabric.
This is how I got away with using an even number of fabric layers.
The center layers were grey flannel.  The outer most layers were a blue/violet tie-dye pattern.
The top photo shows the royal purple I used under the tie-dye on one side.
The bottom photo shows the bright blue I used on the other side.
The sides are different, but the difference is very subtle.
Next time I try this I'm going to make the 2 sides much more different.


As you might be able to guess, I spent almost as much time taking photos of the scarf as I did making it!  I'm trying really hard to learn the manual settings on my camera.  I took a few photography courses in college, but those were years ago and we used real film.  I remember just knowing which adjustments to make to change the focal length and shutterspeed to use to get the photo I wanted.  Now it's a lot of hit and miss, referring back to my manual a million times, and head-scratching.  My biggest trouble now is with focusing.  Maybe my up-close vision is deteriorating as I approach 40.....?  I can't see well enough through my little camera view finder to know if my image is sharp or not.     


Linda said she made her scarf in 2.5 hours.  It took me more like 4 hours.  But I was dealing with very odd-shaped pieces of fabric and had some trouble finding the bias.  The grey flannel is from a set of sheets I bought at the thrift store.  That was a rather large piece of material to deal with.  The other fabrics were in small enough pieces that I had to piece it together to make them long enough.  


Overall I am very pleased with this scarf.  I love the softness and warmth provided by both the chenille effect and the flannel.  I spent no money making the scarf either.  I love to be able to finish a project without having to run to the store to buy supplies.  I chose not to make the tassels on the ends, opting for a simpler look.  But I love the way Linda's tassels look like twisty little caterpillars.....I may slice in some tassels down the road!

I'm curious to hear your comments on this post.  What do you think of this technique?  Would you ever try it?  Any tips on switching your camera over to manual settings would be greatly appreciated as well!

Happy crafting and big hugs from Montana,
Pin It
Before you click away, I'd like to invite you to join in my current sewing/craft challenge.  

Sunday, December 16, 2012

Curved Seams Sewing Challenge Jan 2013


Curved seams.
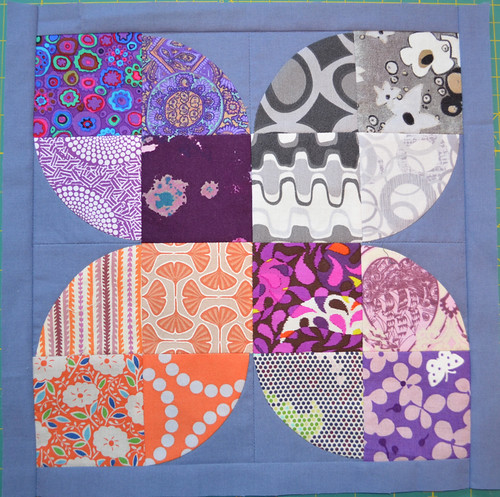
I've never tried them before, but I've been wanting to ever since I first saw the popular 
drunkard's path quilt block.  Here's a beautiful example of the drunkard's path block in action:
[I found this pillow at Made On Main Street]
And here's another way to arrange the blocks:
5 x 4 Modern Bee - Block for Megan - Hive 12
[I found this block at She Can Quilt]
I'm excited and eager to add this technique to my bag of tricks.  I hope you are too!


If you're new to my sewing challenges, you can visit my challenge page and visit all my previous challenge homepages.  Basically, I provide a challenge and participants attempt to meet it.  

The focus is on:
  • committing ourselves to learn/try something new,
  • to step outside our sewing boxes, and 
  • to meet a reasonable deadline   
It's always fun and inspiring, and it's a great opportunity to meet other creative and crafty people.  After the challenge is over, we vote on the finished projects and the winners receive bragging rights and a fancy blog button.  You think this might be something you'd be interested in?  Keep reading!


Rule #1
Make a something new with curved seams and finish it by Jan . 31, 2013.

Rule #2
By curved seams, I'm referring to flat curved seams like you would see in a drunkard's path quilt block.
I presented the drunkard's path quilt block as inspiration, 
but as long as your project has one or more curved seams, it qualifies.

Rule #3
If you're already an expert on curved seams, please challenge yourself to use this technique in a new way. 
This is a great opportunity to go crazy and get really crafty--so go for it!


Now thru January 31, 2013
Time to sign fill out out the sign-up form below and finish your project.

February 1-28, 2013
Our just-for-fun poll takes place.

Mid February, 2013
A new challenge for March will be announced.

First week of March, 2013
Winners of the poll are announced and will receive bragging rights and fancy blog buttons.
Sign-up for March's challenge begins.


Visit my FAQ page HERE.


Curved Seams Challenge Homepage

Curved Seams Challenge Homepage


I like to make a Pinterest inspiration board for every challenge.
All the challenge participants can be added as contributors.  
It's an easy way to share links, techniques, and ideas.
January's challenge board:
Previous challenge pinboards:


  • Ring You Neck Inspiration Motherboard!
  • Fab Folds Sewing Challenge
  • 2-in-1 Sewing Challenge
  • Garment Sewing Challenge
  • Solids-Only Tote Challenge
  • Naughty Notions Challenge
  • Typography Challenge


  • Visit Threading My Way!


    Visit Play Sculpt Live!


    Visit Artfully Caroline!

    Visit Celtic Thistle Stitches!


    Happy crafting and big hugs from Montana,
    Pin It

    A Christmas card & giveaway to my readers:


    Merry Christmas and Happy New Year!

    Friday, December 14, 2012

    E-reader, Nook, ipad stand tutorial


    Mr. Ricochet gave me a Nook e-reader for Christmas a couple years ago, and it's really been the best gift ever.  I use it everyday, several times a day.  Besides reading, I check my email, facebook, pinterest, twitter, blog comments, etc. If I could edit blog posts from it, I'd be in heaven!  But realistically, I'd never get any sleep if I could blog in bed!

    Thursday, December 13, 2012

    Blog Makeover!


    Maybe you've noticed things are looking a little different around here?  No?  Well then you must be new!

    Wednesday, December 5, 2012

    DIY Foam Ball Ornaments


    When I was in Girl Scouts (many years ago!) we hosted an annual Christmas Bazaar for the community to buy & sell their crafts and baked goods.  One year my troop made ornaments to sell.  We started with ready-made satin-covered foam ball ornaments.

    Monday, November 26, 2012

    2 1/2 Hour Chenille Scarf Tutorial by Linda Richards

    "Ring Your Neck" Scarf Making Challenge participant, Linda Richards doesn't have a blog so I am hosting her entry into the challenge.  She created this gorgeous chenille scarf and has graciously included a free tutorial.  Linda has an online store called Desert Designs featuring her beautiful smocked items.  Please check out her site HERE.

    Cyber Monday Sale Not to Miss!

    click HERE to go directly to the sale.

    Monday, November 19, 2012

    Thursday, November 15, 2012

    Pull-thru Scarf

    Hello my lovely readers!
    My current sewing challenge is the "Ring Your Neck" Scarf-Making Challenge.  You can sign up now if you think you can make a scarf by the end of November.  Anyone can join in!  If you look at my right sidebar, you'll see the list of all the challenge participants that have blogs or websites.  I encourage you to visit them and see what their recent projects.
    Related Posts Plugin for WordPress, Blogger...